When you think of DIY and upcycling, Geneva Vanderzeil is usually top-of-mind with her creative projects turning the drab into fab! Her work as a blogger, author and a Cricut ambassador shines a spotlight on how easy it is to create stunning home décor through easy instructions, accessible materials and a passion for DIY.
Get making with these three inspiring, creative Cricut projects by Geneva Vanderzeil!
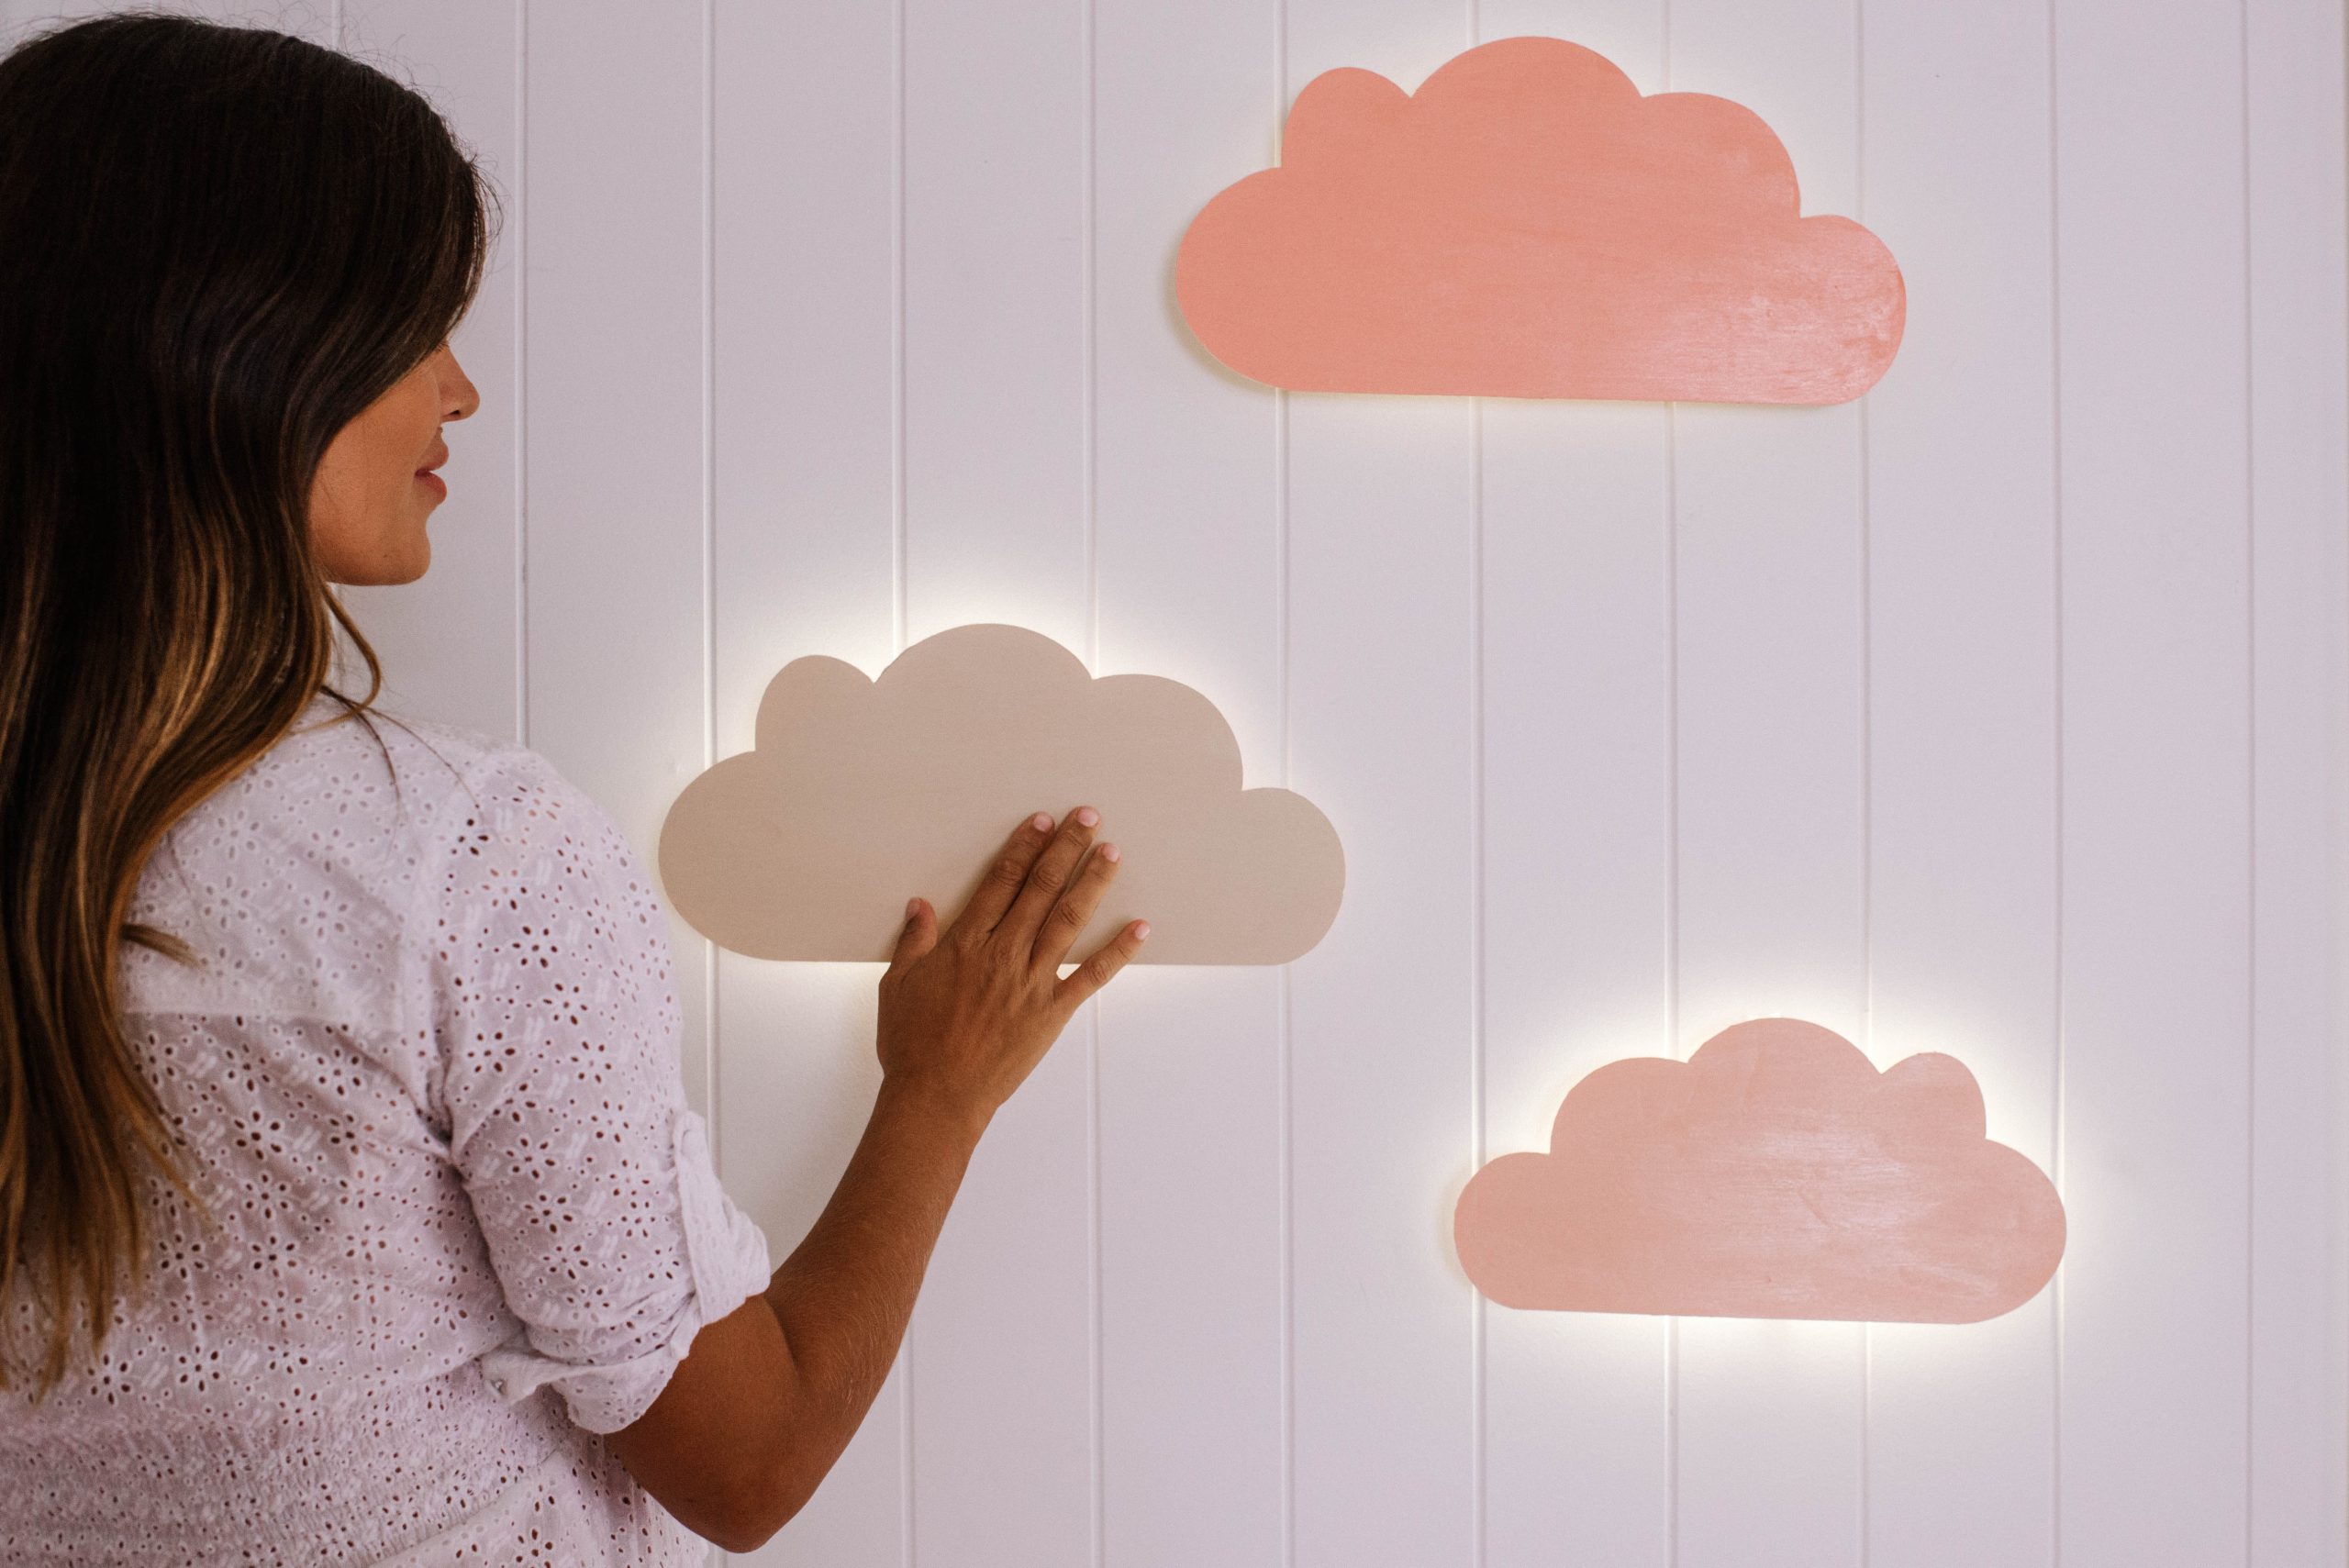
Cloud Wall Lights
This trio of wooden cloud night lights in dreamy pink and cream hues are perfect for the bedroom, as the warm colours will lull you back into a slumber, while the backing light provides a comforting glow. Geneva has simply cut cloud shapes on her Maker 3 from balsa wood sheets, painted them and attached press on LED battery operated lights. This DIY project is fun and functional, and we think these lights are the perfect addition that would be welcomed by any child!
To make these you’ll need:
- Cricut Maker 3 Cutting Machine
- Cricut Knife Blade
- Cricut Strong Grip Mat (purple)
- Basswood or Balsa Wood Sheet
- Battery powered puck lights
- Paint and Paint brush
- Super glue
- Twine
Make it!
- Select and set up your design in the Design Space app. Choose Geneva’s and customise or upload your own.
- Attach the balsa wood or basswood sheet to the strong grip mat using painters tape to hold in place. Insert the knife blade in clamp and follow the prompts in design space to cut the sheet. Note: Instead of doing one single cut like when you use vinyl, the machine does a number of cuts, which is what gives the final design such a smooth finish. This design was cut 14 times.
- Aim for two layers of wood for each light to make them sturdy, so cut 6 cloud shapes in total. Using the superglue, glue together two of the clouds for each light. Then paint the front side of the lights. Note: For an added dreamy effect, once the glue has dried, paint two coats of acrylic paint.
- Select a simple sunset palette for this but choose any tones you like.
- Glue together the three wooden circles, and glued them onto the front button of the puck light. Once the paint dries, glue the back side of the puck light to the back of the cloud light.
- Tie twine around the puck light to create a hanger for the wall. The final step is to hang the lights on the wall. Once you have done that, you should simply be able to press on the front of the light for the puck lights to turn on.
Check out the project on Design Space here.
Checkered Glassware
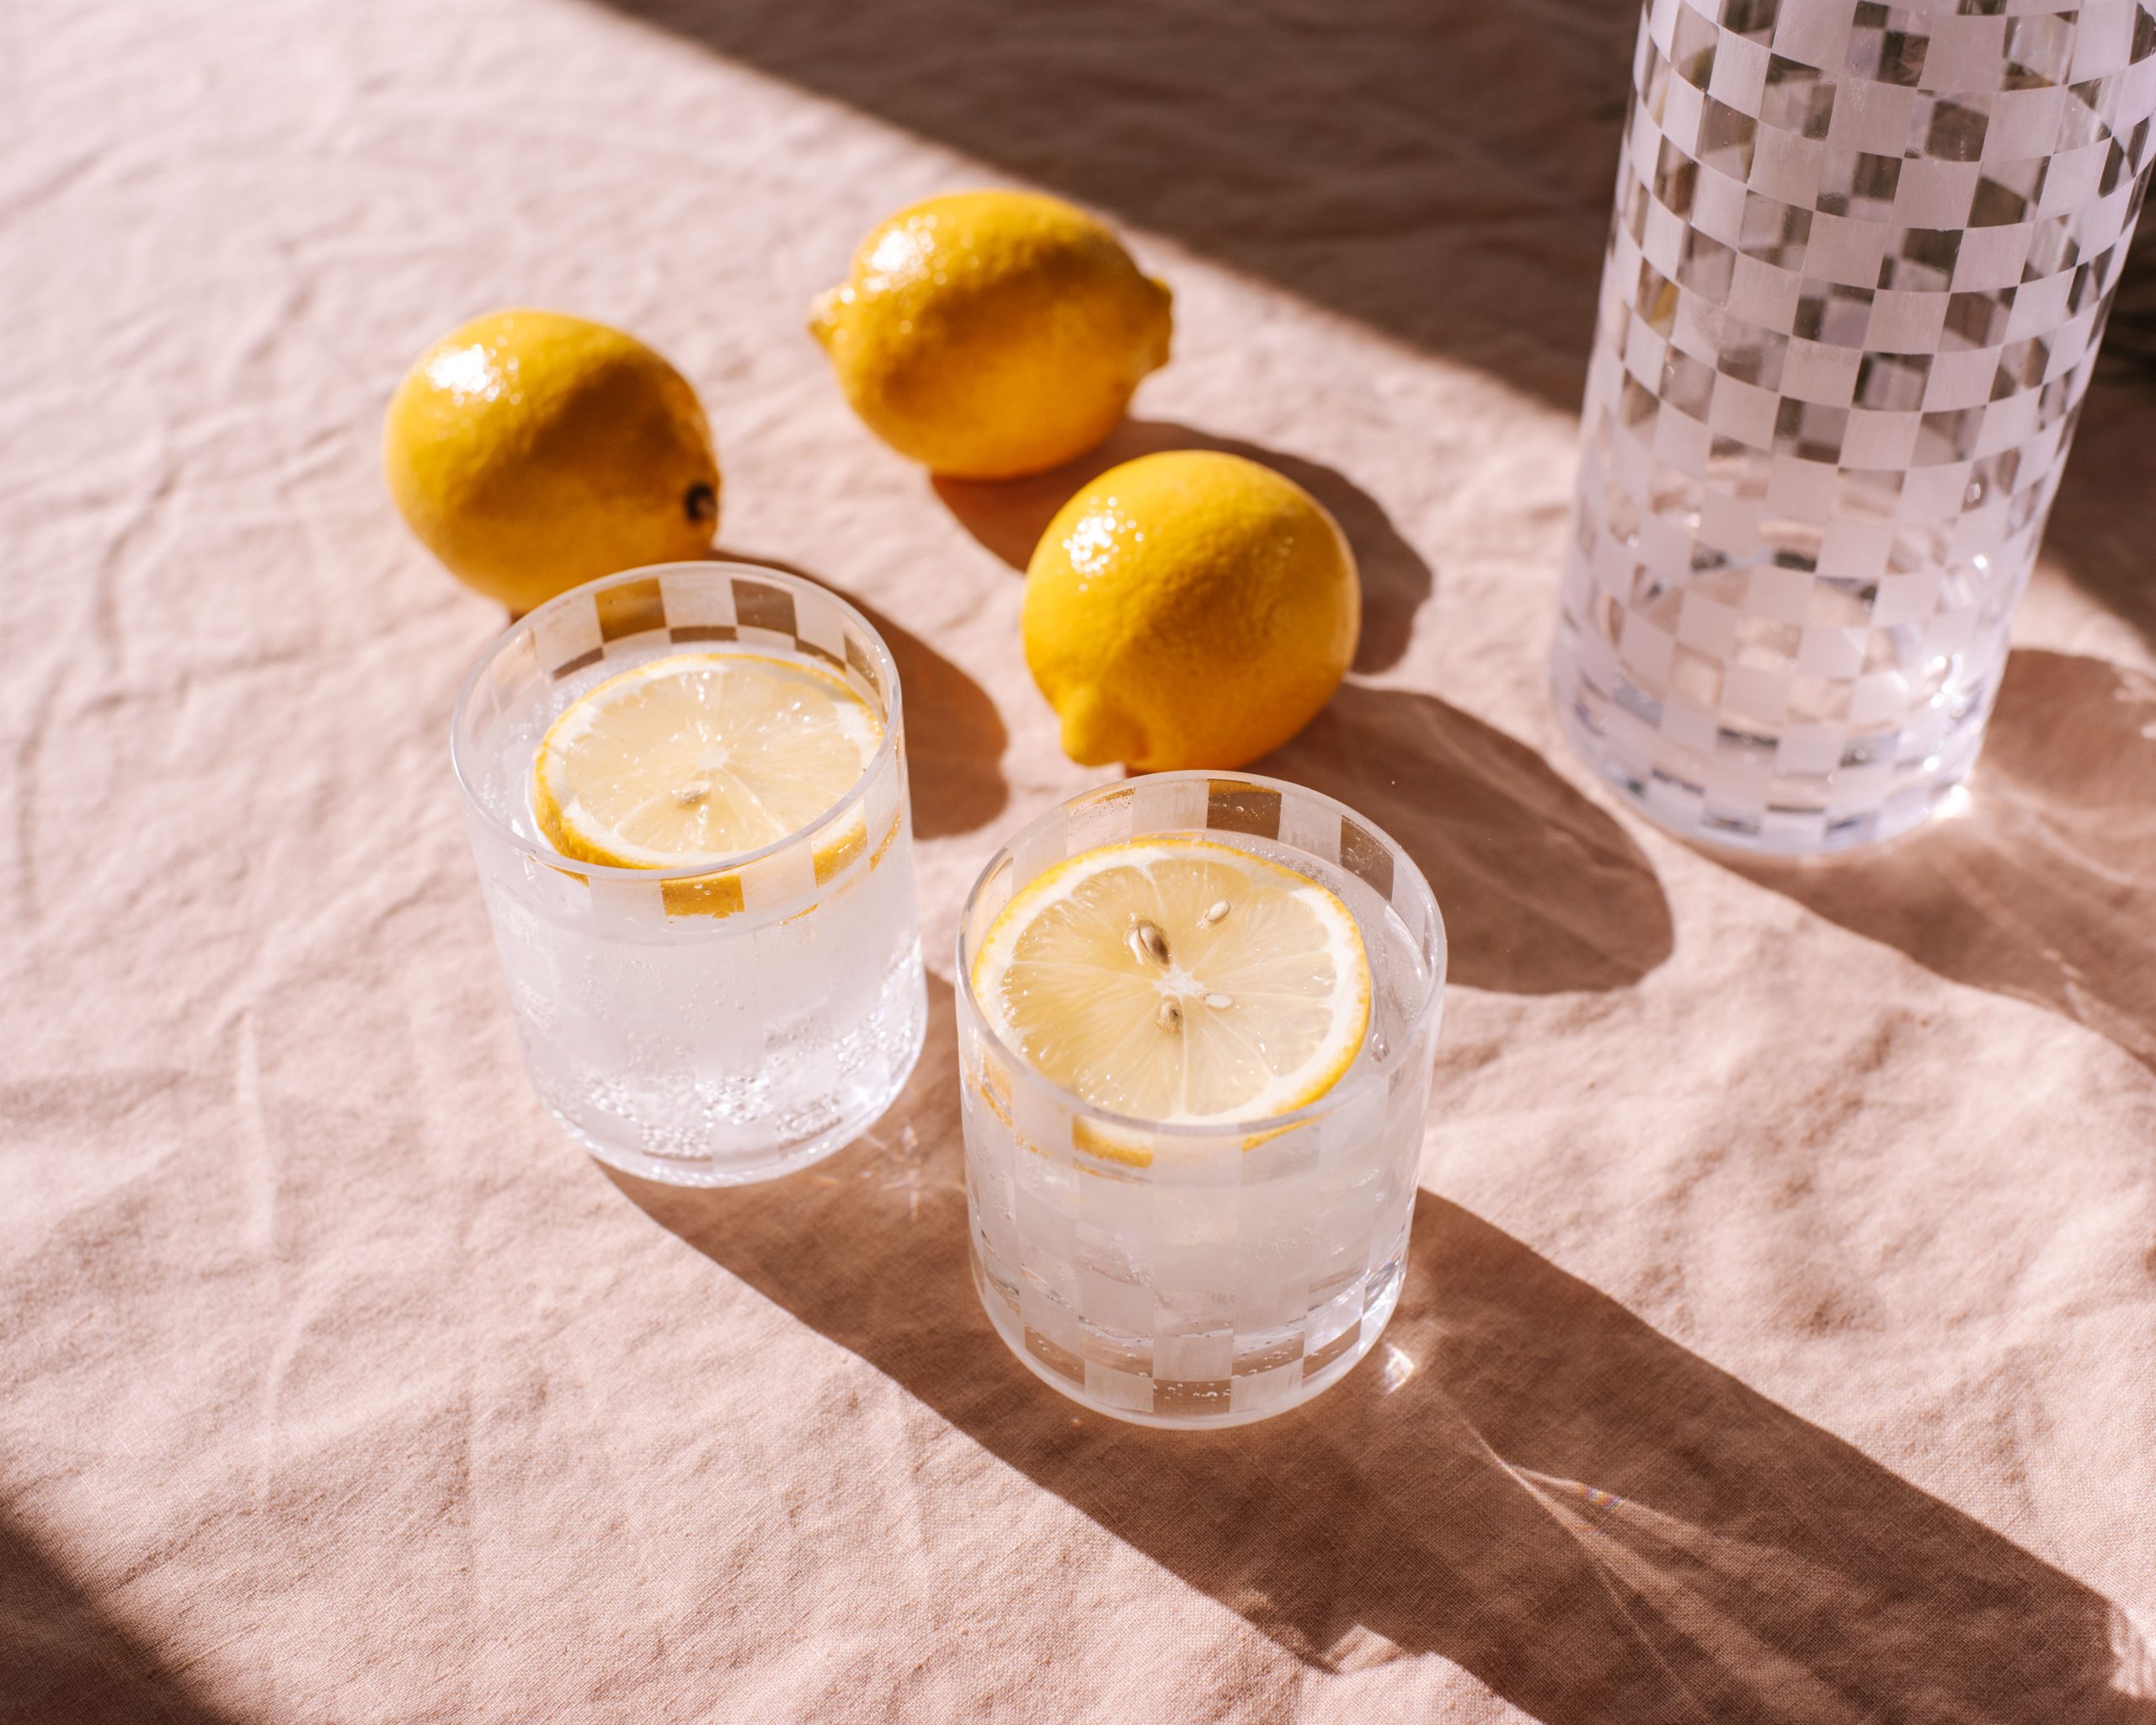
It’s always great to have a unique piece of décor in your house that makes a statement, whether you are making it for yourself or as a customised gift for someone special. For Geneva, it is her super easy Checkered Glassware which initially started off as discarded glasses and a carafe from the charity shop, and were turned into an incredible matching, on-trend collection created with Cricut!
To make these you’ll need:
- Cricut Maker 3 Cutting Machine (or the Cricut Explore 3!)
- Cricut Smart Stencil Material
- Cricut Scraper
- Cricut Standard Grip Mat
- Precision Tools
- Clear Glassware
- Glass Etching Cream
- Disposable Gloves
Make it!
- Clean the glasses and carafe with warm soapy water to remove any dirt or dust that may have built up over time. Make sure you don’t use a glass cleaner that advertises fingerprint resistant. This type of cleaner will leave a filmy residue on your glass and will work against the glass etching cream.
- Find Geneva’s design here in Design Space, simply press Make It and the app guides you through the process of cutting the design out. Smart Stencil Material won’t require the use of a mat, so simply insert the material into the smart cutting machine.
- Once the cut is complete, unload and weed the design using a weeding tool by removing all negative space.
- Using transfer tape, press it onto the checkered pattern, carefully pushing it down with the scraping tool to ensure it is easily picked up. Geneva cut the checker pattern to apply in sections as she found this easiest to keep it straight.
- To transfer the pattern into the glass, take the transfer tape that holds the checker design and press it down on the glass carefully, making sure to check the design is straight. Use the scraping tool to remove any bubbles and make sure the design has adhered to the glass.
- For the carafe, you will need to slightly change the design as you go up to the top of the bottle (depending on your bottle) as the circumference will most likely get smaller. Going in smaller sections of stencil is the best approach.
- Carefully remove the transfer tape by folding it back on itself carefully and pulling it away. If any small squares come away with the transfer tape use the scraping tool to press them back down. To transfer the next section, check that the pattern matches up and no gaps are left in the design.
- Once the design is transferred onto the glass, carefully cover the outside of the glasses and carafe with glass etching cream. Leave for approximately 10 minutes before gently rinsing off any residue with warm water and then thoroughly clean with hot soapy water.
- Using Cricut tweezers, carefully peel off the Smart Stencil Film and give the glasses and carafe another very good clean in hot soapy water.
Check out the project on Design Space here.
Wooden Jewellery Holder
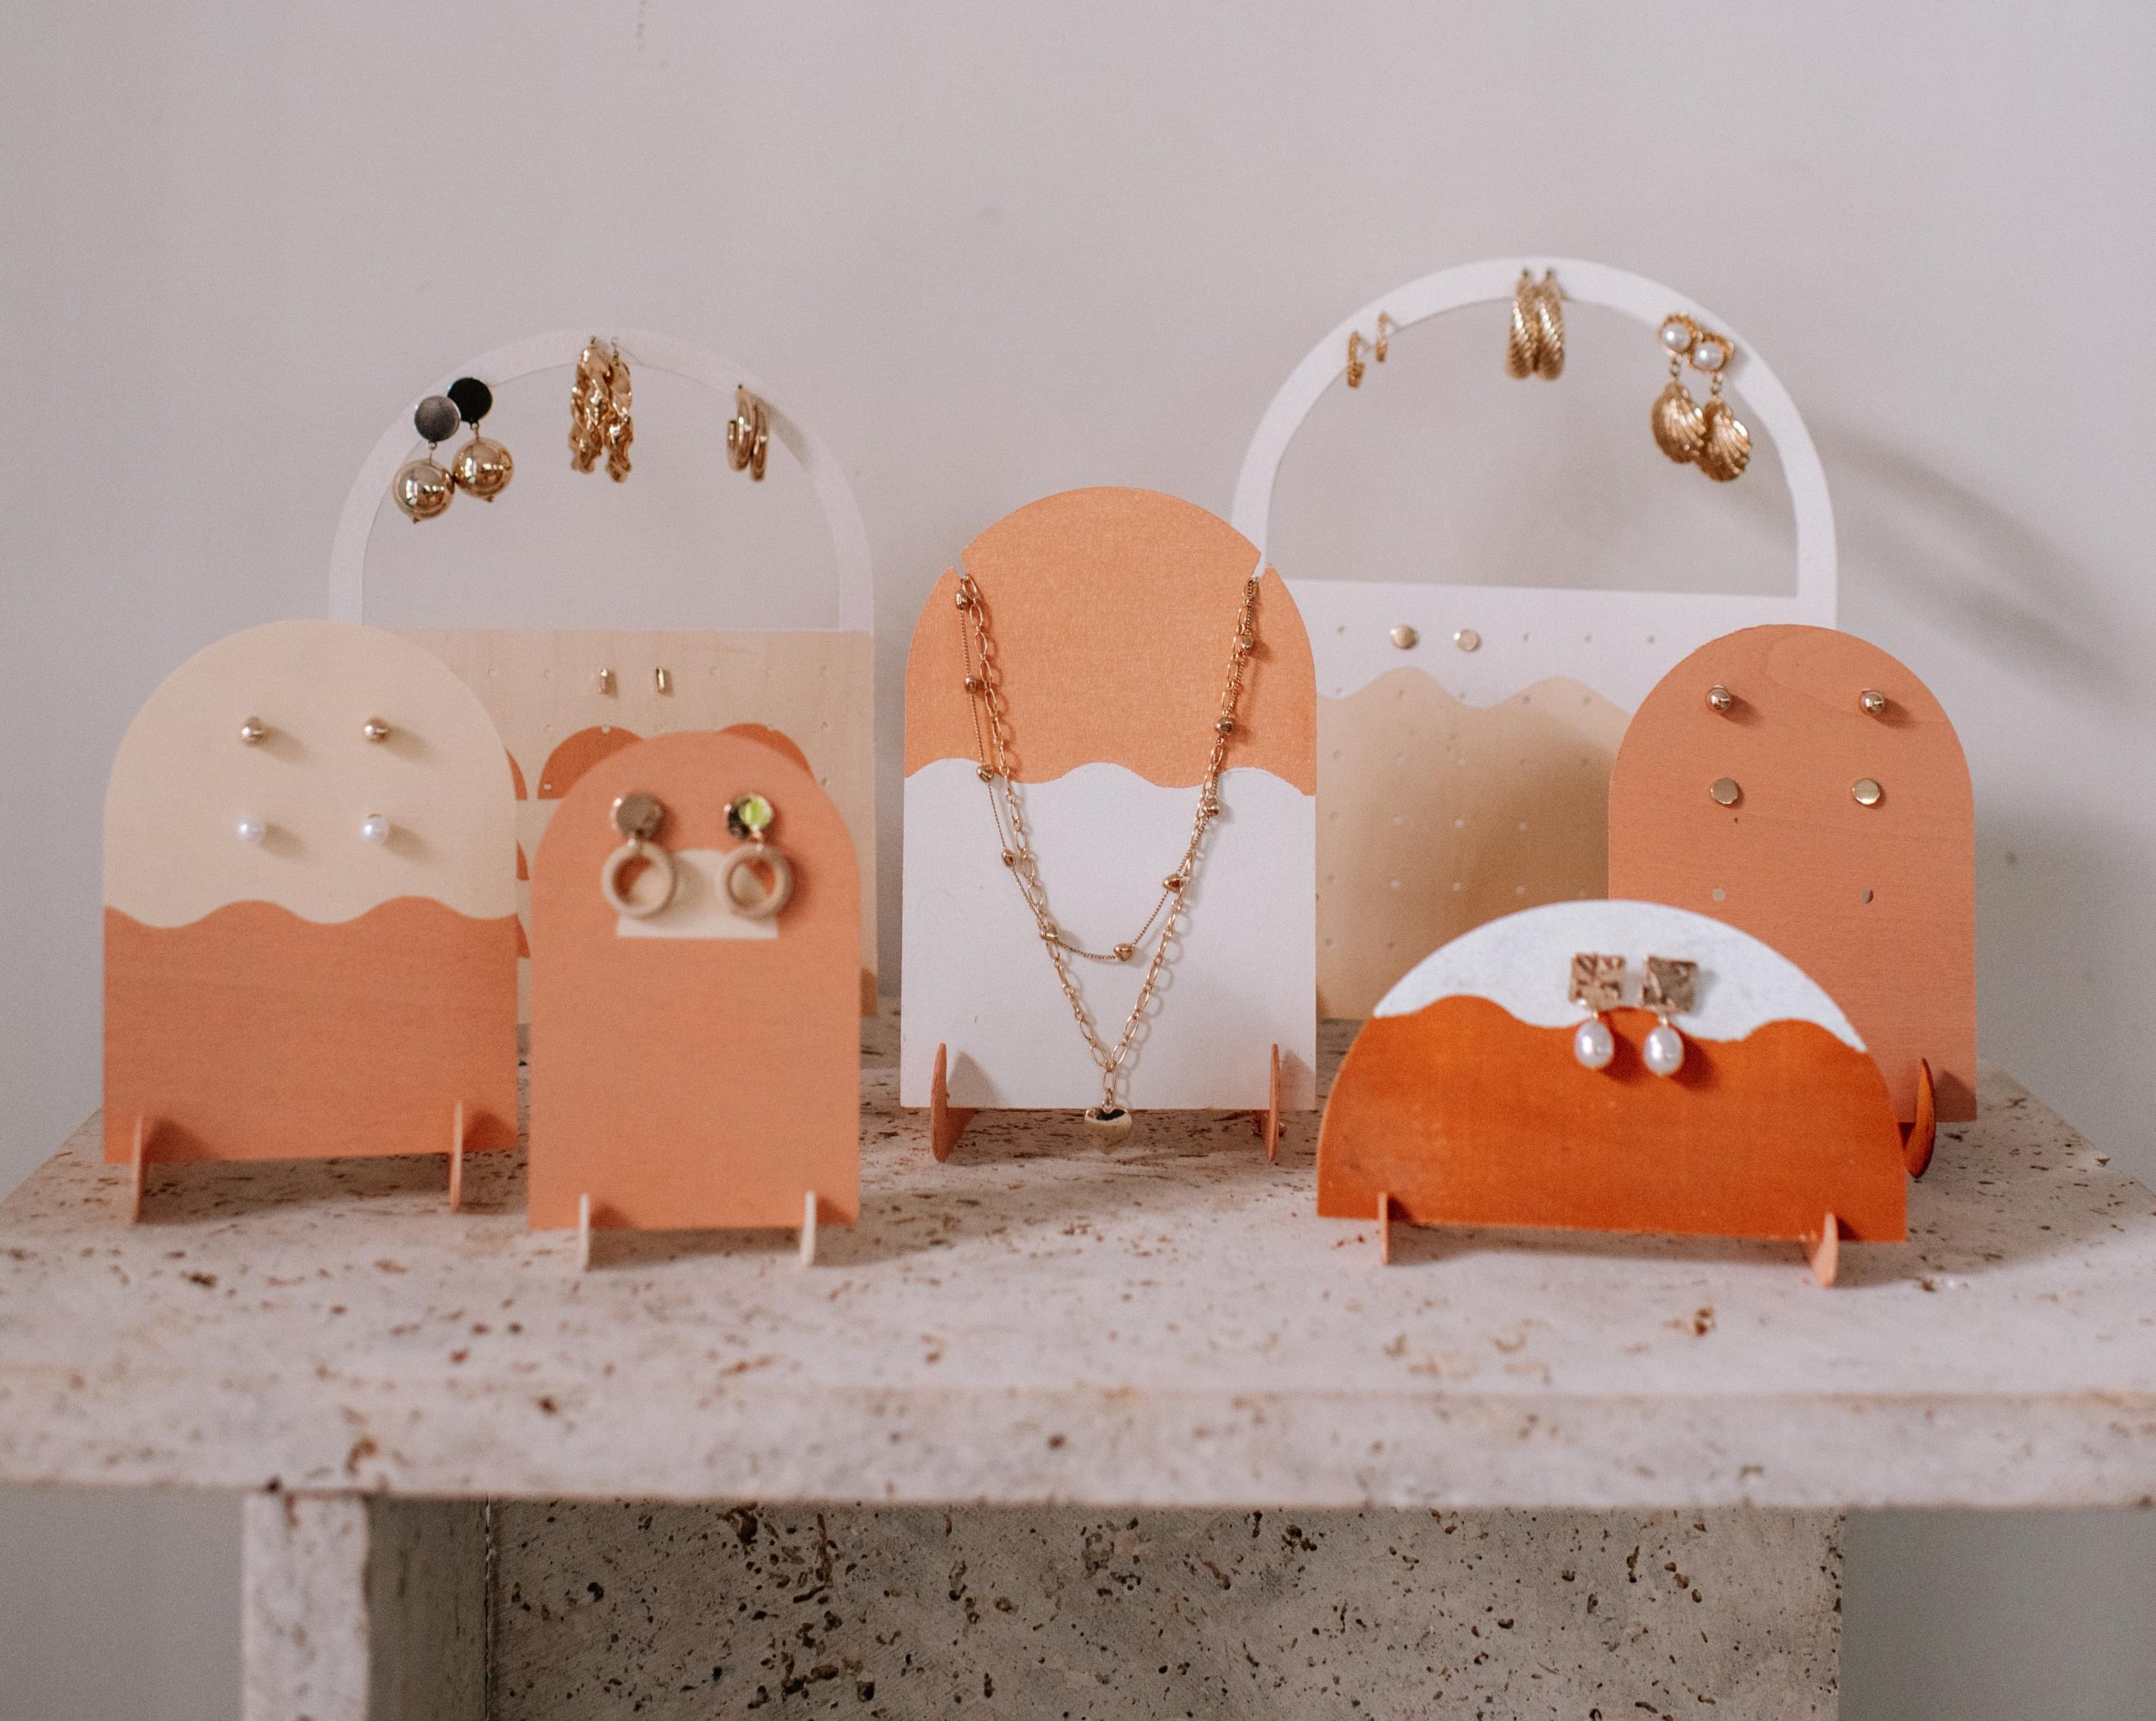
An all time favourite for those who love displayed jewellery, this stunning set using Cricut to cut the basswood or balsa wood turns all jewellery into a work of art. These bright and beautiful pieces aren’t just relegated to the corner, but can truly let your favourite pieces shine, which is exactly what Geneva aims for in all her creations!
To make these you’ll need:
- Cricut Maker 3 Cutting Machine
- Basswood or Balsa wood Sheets
- Cricut stencil material or vinyl
- Glue Gun
- Paint and Paint Brush
- Painters Tape
Make it!
Design Space
- Select and set up your design in the Design Space app. Choose Geneva’s and customise or use the shape tool or images to create your own. Once you’re happy with your design, you can select ‘Make It’ in Design Space selecting basswood as your material type and ensure the thickness is correct.
Cutting the wood
- Before you begin cutting, insert the knife blade into the machine, and then calibrate it in the Design Space settings. Ensure that the material you use is only 27.5cm wide and align it with the top left corner of the adhesive area on the machine mat to prevent it from passing under the star wheels. If your wood is going under the wheels, then trim it down before you begin.
- Tape the wood down to the mat (use the purple strong grip cutting mat) on all four sides to prevent slippage while cutting. Insert the wood into the machine and follow the prompts in Design Space.
- The Cricut machine creates such a professional finish by making several cuts or passes, rather than cutting the design in one go. Once the design has been cut, the machine will stop and give you a chance to check that it has cut all the way through. If not, you can follow the prompts for the machine to make a few more passes.
Assembling
- Once the design has been cut out, all you will need to do is pop the wood out (always the most fun part!) and put the design together. Like Geneva, you can add a painted design to your stand using a stencil (which can be created using cut out Cricut vinyl).
- You will then need to attach all your pieces of basswood to create your stands and it’s as easy as that! And as with any Cricut project, you can use whatever shapes, colours and aesthetics suit you. Everything is always custom.
Check out the project on Design Space here.
Want to shop Cricut? Find a retailer near you here!
You Might Enjoy…